To accomplish this task is simply straight forward as the below 2 points:
Update two Presentation Variables say @{StartDate} and @{EndDate} with the Start Date and End Date prompts.
Then have a Table View with two filters on the Date Column i.e Date >= @{SartDate} and Date <= @{EndDate}.
We will be following the 2 above steps and also tweaking the prompts to overcome OBIEE's default behavior to reach our goal.
- Goto the http://localhost:9704/analytics url, then select "New" -> "Dashboard Prompt" then the subject area "Sample Sales"

- Create a new "Column Prompt" by selecting "+" symbol, then in the "Select Column" window select "Time" -> "Per Name Month" then click the "OK" button.

- In the "New Prompt : Per Name Month" window, under "Options" section , for "Choice List Values" select "SQL Results" and add the below SQL statement:
- SELECT "Time"."Per Name Month" MTH1 FROM "Sample Sales" ORDER BY MTH1.
- Then click the "Edit Formula" button for the "Prompt For Column" field.

- In the "Edit Column Formula" window enter " 'SDate' " for the "Column Formula", the click the "OK" button.

- Uncheck the both "Enable user to select multiple values" and "Enable user to type values" checkboxes.
- Check the "Require user input" checkbox.
- Select "Presentation Variable" for the "Set a variable" field and in the below text box enter "StartDate", then click the "OK" button.

- By following the above similar steps create a "New Prompt: 'EDate' entry as show below, then click the "OK" button.
- Make sure the "Presentation Variable" for the "Set a variable" field and in the below text box enter "EndDate", then click the "OK" button.

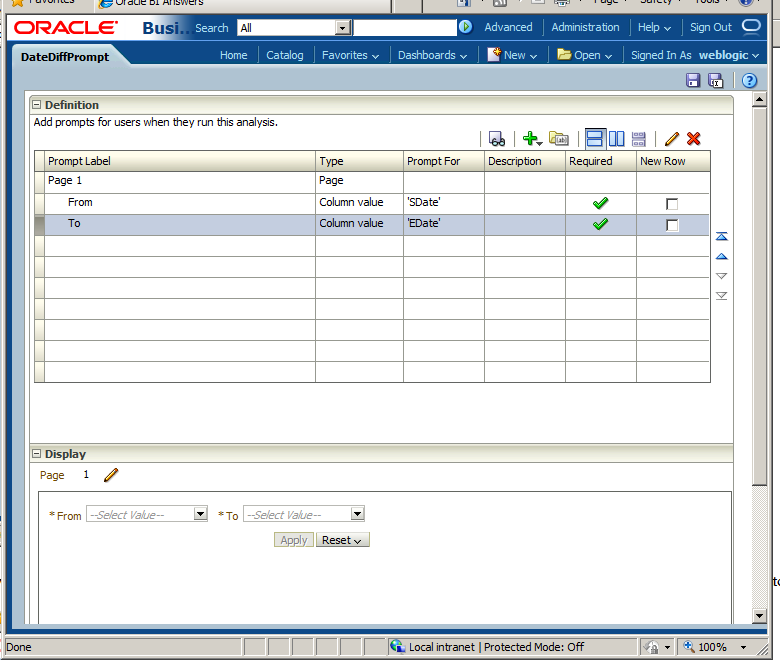
- On the final "Definition" screen make sure to select "Row-based Layout" as show below and click on the "Save Prompt" icon to save.

- Save your Dashboard prompt under the "Shared Folders" -> "11g Shared" and name it as "DateDiffPrompt" and click the "OK" button.

- After creating the above two dashboard prompts. We now have to create our report or analysis to use the two date prompts.
- From the "Oracle BI Answers" web page select "New" -> "Analysis" -> "Sample Sales" to create a new report.

- Select the columns as shown below i.e. "Per Name Month" and "Revenue".
- Select the "Per Name Month" options and select the "Filter" option.

- In the "New Filter" window select "is greater than or equal to" for the "Operator" field.
- Enter "StartDate" for the "Variable Expr" field, then click the "OK" button.

- for the same column "Per Name Month" select the "Filter" option and in the new "New Filter" window select "is less than or equal to" for the "Operator" field.
- Enter "EndDate" for the "Variable Expr" field, then click on the "OK" button.

- Make sure that both the columns and filters are created per shown in below snapshot.

- Click the "Save Analysis" icon and select the "Shared Folders" -> "11g Shared" folder and enter "DateDifference" for the "Name" field.
- Click the "OK" button to close the window.

- Goto the "Dashboards" in the Answers menu and select "My Dashboard" the on the top right select "Page Options" -> "Edit Dashboard"

- In the left side "Catalog" window drag the "Shared Folders" -> "11g Shared" -> "DateDifference report and drop it onto the right pane with "Drop Content Here" text.
- Drag the "DateDiffPrompt" prompt on top of the "DateDifference" section so it is placed in a new section as show in the below screenshot.
- Click the "Save" icon then click on the "Run" icon to show your dashboard.

- You should now see the two prompts with a blank report.
- Select a date from the "From" prompt say "2008 / 02" then a date from the "To" prompt say "2008 / 07" the click the "Apply" button
- You should now be able to see the selected months in your "DateDifference" Report table.


If you will like to test out the OBIEE default behavior change EDate to SDate in the "Prompt For Column" field in the "New Prompt" window in one of the previous steps, save and re-run your dashboard.
Summary:
Due to the default OBIEE behavior we had to keep two different names for the "Prompt For Column" i.e "SDate" and "EDate" to make the prompts have an effect on the "DateDifference" table.
No comments:
Post a Comment